Sunday, November 27, 2011

Decorating Block

Lately I’ve been stumped when if comes to decorating.  I just can’t seem to in vision what I want things to look like.  My creativity is in a vacuum.  However, there are several possible  reasons.
1) I am limited to what I can currently decorate.  Having your house on the market is hard for someone that loves changing things up and decorating for holidays.  I’ve tried very hard to keep things very neat, clean and uncluttered.
2) I am pretty stressed out.  We have TWO houses on the market and with the current market things are slow.  This pretty much sums up most of my STRESS although I could throw in the constant flow of other stressors but that list is too long :)
3) Saving money is pretty important to me right now.  I am trying to stay away from TJ Maxx and HomeGoods as well the flea market.  I don’t want to buy new stuff for the house when we could be moving to a new place soon anyway.
BUT….I am going to blame it on being TOTALLY ADDICTED TO READING BLOGS!!! Don’t get me wrong I am completely inspired by most of what I see by reading my favorite blogs and I am amazed at all the talent and neat things that people think of.  I get a lot of ideas by reading blogs and magazines but I think seeing all the ideas floating around is preventing me from coming up with original ideas of my own.  I noticed this happening when I started decorating for Halloween, my favorite holiday, and I was at a loss on ideas and now I feel the same way with Christmas decor.  Do you guys feel this way too?? 
I  have been working on Christmas decorations this weekend and I finished today. Mainly I stuck to the dining room…a small Christmas tree, new table setting, some ornaments and I will add some fresh greenery and flowers later.  I spray painted some older things to reuse and save money (which was a little creative:).  Overall I  am happy with the results.  It’s not a  lot to get excited about, it’s much less than I normally do but I wanted to keep it simple and I am pretty bored of the Christmas decorations I have and I am not buying new things this year. 
With all that being said I am sorry I have been slow to blog this month…I am low on ideas!  It does make me look forward to moving a little more because I know that will bring a new palette to work from and I will probably purge a lot of things I no longer use. 
I did want to share with you an idea I had for Christmas this year.  I was putting away my Fall stuff and I had a lot of left over pumpkins so I decided to paint them and re-use for Christmas. 
IMG_6347 
The idea was that they would look like ornaments.  I broke out lots of paint colors and glitter.
IMG_6348
IMG_6349
Here is the final result.  I just added them back to the plate they were on for Halloween and put them on fake snow.
IMG_6350
Umm, so they look like painted pumpkins….Project Fail! 
IMG_6356
Not the worst idea I’ve ever had and I think they could be really cute.  Maybe I should have stuck to normal Christmas colors or painted the stems.  Spray paint would have also saved a lot of time but I was glad to have an idea to put into motion. 
I picked the colors that I did because I put them in the kitchen and the only other decor in the kitchen are these letters I painted last year that were a success in my book.
IMG_6358
IMG_6359
I will be sharing my other Christmas decorating later sometime in December. 
Have you started decorating for Christmas?  Do you feel stuck on ideas too and what do you blame it on?

Linked to...
At: www.bowerpowerblog.com


April

Tuesday, November 15, 2011

Pie Safe

I’ve been working on another one of my estate sale finds that my Mom found a few months ago.  It appears to be a pie safe or the start to one.  Looks like it was never finished, however, it did look like it had doors at one time but it was still bare wood.  I thought it would be a nice shelf to use in my dining room to store extra dishes.  It got a coat of white paint to that matches the paint on my table and the back is painted with chalk paint to match my buffet.  You can see those post here and here.
IMG_6322
Here are the before shots
IMG_6206
IMG_6208
IMG_6209


Lots of nail holes and gaps to fill on this one.
IMG_6323I really did try to stage this better.  I just could not think of what to do!  I honestly thought about getting out some Christmas decorations, but I just couldn’t do it…not yet. 

For a little how to info…I sprayed the white on with my Wagner power sprayer and then painted the back in Paloma chalk paint. 
IMG_6321I distressed all of the edges and distressed the top bar on the back where you see the white poking through.  Not sure if I love that white popping through the chalk paint but I do like the distressing on the white.   
IMG_6324
Here it is in it’s new home. 
IMG_6326 Abbie says Hi!

April
Linking to:


Sunday, November 13, 2011

New Home Construction Update

Hey Everyone!  Sorry I haven’t checked in this week.  Busy as usual around here.  I did take some time today to organize my pantry and my bathroom cabinets!  Made me feel productive.  I have also been slowly working on my latest piece of furniture, hopefully post to come this week. 
I stopped by the new house we’ve been building in the neighborhood we are developing and it is finished!  We are hoping to get some good showings over the next few weeks and hopefully an offer.  It is the cutest house!  I have lots of pictures here, sorry none of the upstairs…my camera battery died.

IMG_6291
IMG_6289
IMG_6293
IMG_6294
IMG_6295
IMG_6296
IMG_6298
IMG_6300
IMG_6301 Love this Dutch door!
IMG_6297 Breakfast Nook
IMG_6304 Living Room
IMG_6309 Living Room
IMG_6302
IMG_6307 Dining Room
IMG_6314 Master Bedroom
IMG_6315 Upstairs Stairway
The upstairs has two bedrooms and a large loft area just off the stairs that can be used as a playroom, bonus room, living area, or office.  There are also 3 bathrooms, 1 hall bath upstairs, master bath, and 1/2 bath downstairs. 
If you are in the Raleigh area and are looking for a new home please email me for more details!  This house is in Zebulon, NC and it is really beautiful. 
Hope everyone has a great Monday!
April

Sunday, November 6, 2011

Christmas List

I know I know it’s way too early and I’m already sick of the commercials and ads for Christmas but…I’m trying to get my shopping list in order and someone asked me what I wanted.  I thought I would share my Christmas wish list with everyone.

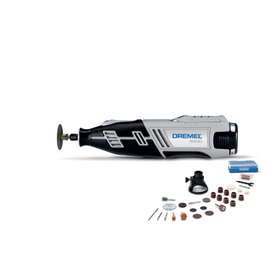
Dremel 1.3-Amp Keyed Cordless Rotary Tool $99.00
Drying Rack -$9.99
Pyrex® Portables® 3-qt Oblong Bakeware Dish w/ Blue Carrier-$19.99
Vintage Ticking Strip Duvet Cover & Shams-$29.99-$129.99
 
Gift Cards to Lowes and Pottery Barn are always great for me and cash would also be great because I’d like to save up for a really nice new camera!
What do you all want for Christmas?!?
April

Tuesday, November 1, 2011

Pinterest Challenge

I am pumped to have another Pinterest Challenge to link to….Thanks to Sherry, Katie, Erin and Ana


My sister-in-law Dana gave me a light bulb a few weeks ago and wanted me to try making a terrarium using it.  We had both seen a clip from CBS Sunday Morning on Terrarium's as well as tons of inspiration on Pinterest. 
This light bulb came from Dana’s Husbands Motorcycle & ATV showroom Cyclemax.  It is a larger commercial bulb, but still a tiny home for plants. 
I found my inspiration from two different pins Pinterest, one is a great video tutorial I’ve shared at the bottom of the post.  You can see the other pin site below too.  I tried to make a video of myself making this one for you guys but it was really awful…  I had to pause many times and you could see my double chin so that sealed the deal of it not making the blog :) 
Here is Finished Product!!
IMG_6280 
IMG_6281
IMG_6282
Step 1….
Gather your materials
IMG_6256
You will need:
Plants…teeny tiny ones
Soil
Charcoal
Rocks or Pebbles
Moss
IMG_6257
Needle Nose Pliers
Screwdriver
Long Tweezers or Tongs
IMG_6258
Container (my choice, a light bulb)
Step 2…
Break the ceramic end out of the light bulb using the pliers and the screwdriver
IMG_6259
IMG_6262
I had to break out an additional glass layer on the inside of this bulb.
IMG_6263
Step 3…
I had to pull out the insides of this bulb and it was NOT easy.   As you can see the inside was wider than the neck of the bulb and I thought I could squeeze it down with the tweezers.
IMG_6265
But…I broke it!!! My one and only bulb!
IMG_6267
But the insides came out easy :)
IMG_6268
And luckily I had some super glue on hand.
After that small hiccup I started layer my materials inside the bulb using the long tweezers and a small measuring spoon.  Starting with pebbles, then charcoal, moss, soil, plant, and a little more moss.
IMG_6270
IMG_6271
IMG_6272
After the plant was added I put a little more soil and moss on top and it’s all done. 
IMG_6273
Click Here to see the Video Tutorial I found through my Pinterest Pin
I also “Pinned” from The Hipster Home –Check out this site for another cute light bulb Terrarium. 
Hope you enjoyed!
IMG_6276
Tip:  The long tweezers came from PetCo pet store…they are actually called long tongs and are used to feed reptiles.  I tried the craft stores first with no luck and found the helpful hint online about finding these at the pet stores.
Be sure to check out all the sites above to see all the Pinterest Challenges :)
April


Linked to: