Sunday, May 18, 2014

Fan Pendant-How To

IMG_4628
As promised, I’m back with a little how to on this fan light.  It was pretty simple, but did take us a little time to figure out how to attach it all because the fan body itself is pretty heavy.
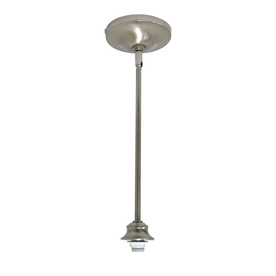
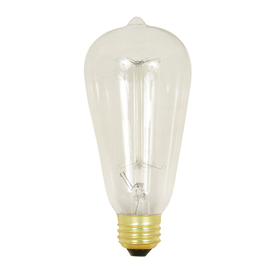
This light cost us less than $30 to make.  We bought a pendant from Lowes and a Edison style bulb like these…

The the biggest obstacle was figuring out how to attach the pendant to the fan box.  Will cut a piece of plywood in a circle with a hole in the center and I painted it white.

Sunday, May 11, 2014

I’m Going to Make a Light Out of It!

IMG_4627
I was visiting my Dad a few weeks ago at the tobacco greenhouse and I saw a pile of fans.  It went like this….
Fan Before
Me: “Hey, what are those fans for?”  Dad: “Oh, those, they are junk…motors broke”  Me:  “What are you going to do with them?”  Dad: “Nothing” Me: “I want the white one” Dad”: “What for?”  Me: “I’m going to make a light out of it” Dad: “You are just like your Mama!”
And the truth of it was…Will was going to make a light out of it!
It was just the kind of junk I’d been hoping for, that piece that sparked instant inspiration and I knew it would make the perfect light.  The one to replace the builder light that was not my style and the last part of the dining room that needed attention.   The piece that makes me proud that  Will is so handy and he can DIY with the best of them!

Sunday, March 16, 2014

Office Makeover

I am going to overwhelm you with pictures today.  I finally finished our home office.  This room has been the one room that I desperately wanted to finish since we moved in and I never really had a plan.  I finally made a list of what I wanted to do and just got to it and finished.
I forgot any before pictures but basically I found file cabinets, a desk chair and painted both.  I  made and hung shades, recovered my bulletin board, hung a filing system, hide cords and painted walls.  It only took me a year to do it! 
Office Now
Room View (2)
Room View
File Cabinet
Terrarium
Bulletin Board
Nipper Picture
Chair
The file cabinets and chair are both painted in Annie Sloan chalk paint, pure white.  The walls are Benjamin Moore Ashley Grey.  The picture of my cat is a print out from Waterlouge App and the frame is recent from Target, Threshold.  The hanging file system is from Ikea.  The lamp is from Hobby Lobby (last year).
Have a great week everyone!

April

Sunday, March 2, 2014

Mini Blind Roman Shades

Happy Sunday Guys! I am back today to show you my marvelous mini blind roman shades.  Last week I showed you my very easy no sew shades for my workout room HERE and today I am going to show you a glimpse into my finally decorated office!
Office Shades Complete
One of the major things I needed to do in here besides paint was figure out a solution for shades.  We have a dedicated home office because Will and I both use it for work regularly.  The room sits off the back of our house and gets tons of morning light which shines right on the computer screen.  As I mentioned in my post last week our windows are an odd size so custom shades/blinds are the only option but I also wanted color so I got creative.  I searched around on Pinterest for a solution and found a way to make roman shades using cheap mini blinds!
We bought cheap mini blinds from Lowes for less than $5 bucks each in 27” and trimmed them down with the dremmel to 26”.  Once I found my fabric I got to work.  The tutorial I used HERE is excellent!  Simply Mrs. Edwards did a fantastic job and I am grateful I found the “pin”.  Please check it out HERE to see her shades.  Here are the steps from my point of view. 
Materials Needed
Supplies
  • Fabric (I needed 2 yards per window)
  • Muslin fabric
  • Fabri-tac glue
  • Heat n Bond no sew tape (iron on)
  • Tape measure
  • Pencil
  • Cheap mini blinds
  • Iron/Ironing board
Step One:
Cut fabric 2” wider than window in width and 6” longer.  Cut muslin to exact window size. 
**If using a fabric with no repeat, this is much easier.  I had to lay my fabric out and really concentrate on where I cut top/bottom and side to side so that all shades matched.  This step took the most time and I wasted more fabric.
IMG_4310
Step Two:
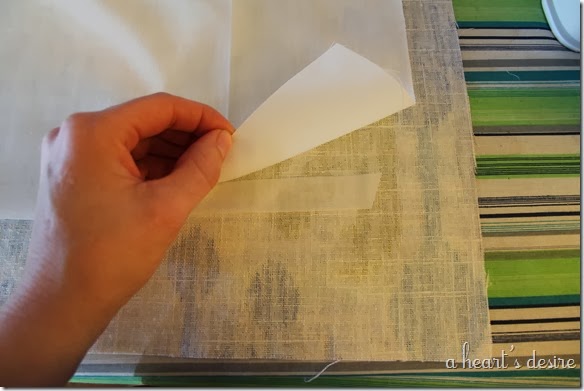
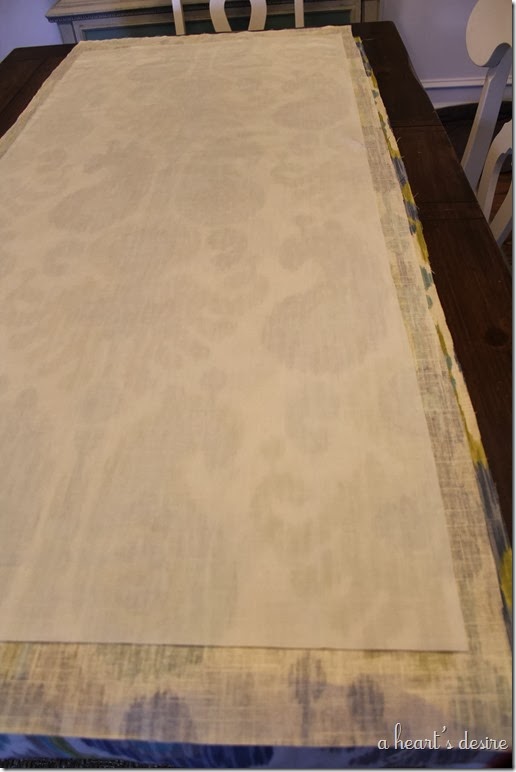
Lay muslin over fabric leaving 3” on top/bottom and 1” on each side. Then use the iron on tape to iron the edges, I secured the bottom as well.
IMG_4311
IMG_4312
IMG_4315
Step 3:
Roll out the mini blinds and start to disassemble leaving only the parts needed.
IMG_4316
You want to cut the cord that holds the slats, the one that looks like a ladder.  Do not cut the cord that controls the blind.
IMG_4319
Take the weighted bar at the bottom off temporarily.  You simple pop out the little circular plugs at the bottom and untie the cord.  Slide the bar off.
IMG_4320
This allows you to remove the slats.  You want to leave enough slats for the folds in the shade.  I left 7, the weighted bar acts as a fold as well.
IMG_4322
Step 4:
Adhere the fabric to the mini blind.  Here you want to lay out your fabric and mark the sides where you want the slats to go.  I measured for a slat every 7.5” inches.
IMG_4323
Next you lay the mini blind over the fabric and arrange each slate in the center of the marking (I marked both sides of fabric)
IMG_4326
I had to make sure I set my top bar the same for each one because of the fabric pattern.  You want to glue the top on first.  This is where the Fabri-Tac glue comes in to secure the fabric.  You add the glue to the front of the mini blind and flip over and press into fabric. Through this make sure not to get glue on your cord.
IMG_4324
Arrange the slats in the center of the mark and glue the front of each one and press down to secure. (dog hair and all)
IMG_4325
Then you work on the bottom slate, gluing to the front first, flip over to secure. 
IMG_4327
IMG_4328
Tie the string back and slide into bottom and put the plugs back in the weighted bar.  Leave just a little slack in the cord, not to tight, not really loose. The add glue to the bottom and sides to secure.  Cut a small slit in fabric to go around the cord.  Trim excess fabric.
IMG_4329
IMG_4330
IMG_4331
At this point you should let them sit for a while to dry and set up.  I waited about 2 hours and then you just hang them up like you would a regular mini blind.  Mine had the brackets secured to inside of window so I just slid these in. It took a minute to pull them up and get the folds to cooperate the first time but they are pretty easy to operate and they look great!! I am really happy with the way they have turned out. 
Office Shades
Here is a look at the back with them hanging.
Shade Back
This project took me about 6-7 hours to complete for 3 shades.  Right now I have more time than money so it was worth it.  Plus I am pretty proud of them.  As for the cost here is the breakdown.
  • Fabric $76.86
  • Muslin $19.80
  • Mini Blinds $12.43 (for 3)
  • No Sew Tape $4.98 (2 rolls)
  • Total cost: $114.07
Shades

April

Sunday, February 23, 2014

No Sew Shades

I have been busy this month working on our office and workout spaces.  For the workout room I wanted to add a pop of color and decided to do that with fabric and try a Pinterest project I’ve been wanting to give a whirl.
There are a ton of “pins” on Pinterest on how to make shade like these.  I used a tutorial from Imparting Grace. I felt like her tutorial was the easiest to follow.  You can see it HERE. I made a few adjustments and here is how I made it work for me.
Roman Shades
DIY No Sew Shades
Materials Needed
  • Fabric
  • Liner Fabric
  • No Sew Tape
  • Measuring Stick or Tape
  • Scissors
  • Tension Rods (I used 8 for 2 windows)
  • Iron and Ironing Board
Materials
Step 1
Measure your fabric.  You want the fabric to be 2 inches wider and 6” longer than the inside of your window.  My windows are 26”x 60”, so I cut the fabric to be 28” x 66”.  I also lined the shades with muslin fabric and cut that to the exact size of the window.
I used muslin to line my fabric.  The tutorial I was using suggest doubling over the fabric.  Liner fabric is cheaper so chose to use that. 
Muslin Fabric on top
Step 2
Hem the edges and bottom with the no sew tape.  Lay your tape on the edge and fold over to 1 inch and iron.  Follow directions for the tape you purchase.
Hem Tape
Step 3
Place a tension rod at the top and fold fabric over 3 inches, place the no sew tape down and iron the fabric together over the tension rod creating a pocket.
Sew in Tension Rod
Step 4
Hang the curtain, then hang your tension rods over the fabric.
Hang Fabric
hang with rods
Here you want to simply pull the fabric under and over the tension rods to create your “folds” in the fabric. 
Workings
That's it!  Super easy and they look great.  Now I have that pop of color and I didn’t spend a lot or invest a lot of time.
INo Sew Curtains
Tips
  • I used Heat n Bond no sew tape for heavy duty fabric, I like this brand a lot!
  • I ran out of the tape (I needed 2 rolls for 2 shades) So I finished the last edge with Fabri-Tac
Fabric Tac
  • If you can sew, it will save you even more time
  • I had to adjust the folds to make it look like the pattern matched on both windows.  I wasn’t paying attention to the pattern as I was cutting and I got lucky it was close, pay attention.
This solution is great form me.  Our windows are not a standard size so I have to buy custom cut blinds or shades which are more expensive.  It is also difficult for me to find drapes because our windows are so high and close to our 10 foot ceilings.  The longer the drape the more expensive. 
Cost
I spent $18 on 4 yards of fabric at Hobby Lobby (used a coupon).  $14 on the muslin, $3 for the tape.  $3 each for the tension rods at $24 (which I already had).  Total of $59. 
Hope to be back in the next week or so with the final reveal of this room and the office reveal…I made mini blind roman shades for that room and I can’t wait to show you!!!
Have a great week!

April